The Sunroom Plan Continues To Evolve

Y’all know me well enough by now to know that the first idea is almost never the final idea. And that’s true with every project I do, whether I’m making a chandelier, designing fabric for curtains, or mapping out a floor plan. I start with one plan, and over time, I let that plan roll around in my mind to see if any changes or improvements come to mind. And of course, I like to bring y’all along with me on that journey so that you can see how my plans evolve.
And there has been a pretty big evolution in the plan for the sunroom. As I’ve already shared, I met with my contractor last week to discuss the options and the process for the sunroom, the existing bathroom (that is completely inaccessible right now), the square footage I want to add in order to square up the area behind that current bathroom with the sunroom, and the roof options over the whole thing. Since all of that area is going to become permanent square footage in our house, both the roof and the floor need to be raised in the sunroom.
After our initial discussion, the initial plan for the sunroom and bathroom area, plus the addition of that additional square footage, looked like this…
The plan was to keep the back wall of the sunroom exactly where it is now, which would make the TV room and the home gym/guest bedroom 12′ 10″ from the music room/kitchen wall to the back of the house.
I also shared with you that Mike (my contractor) and I talked about the possibility of doing this remodel in stages so that we can pay cash for everything as we go. Accruing debt for this remodel isn’t an option that Matt and I will even consider. So it will need to be done in stages. But as Mike and I talked about that process, it became clear that the first stage is going to be the most expensive (which I obviously already knew since it involves a new roof), but also must include things that I hadn’t considered.
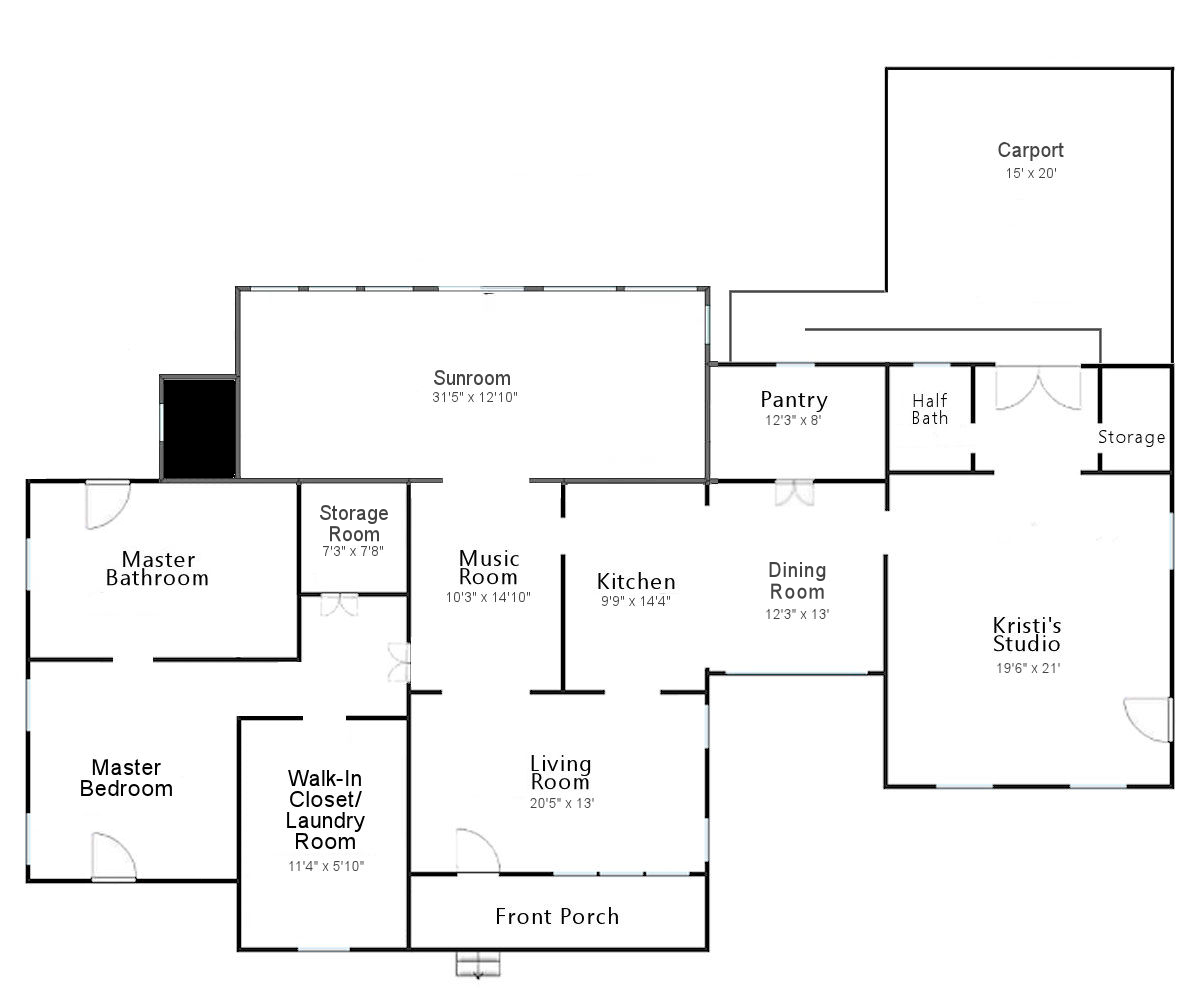
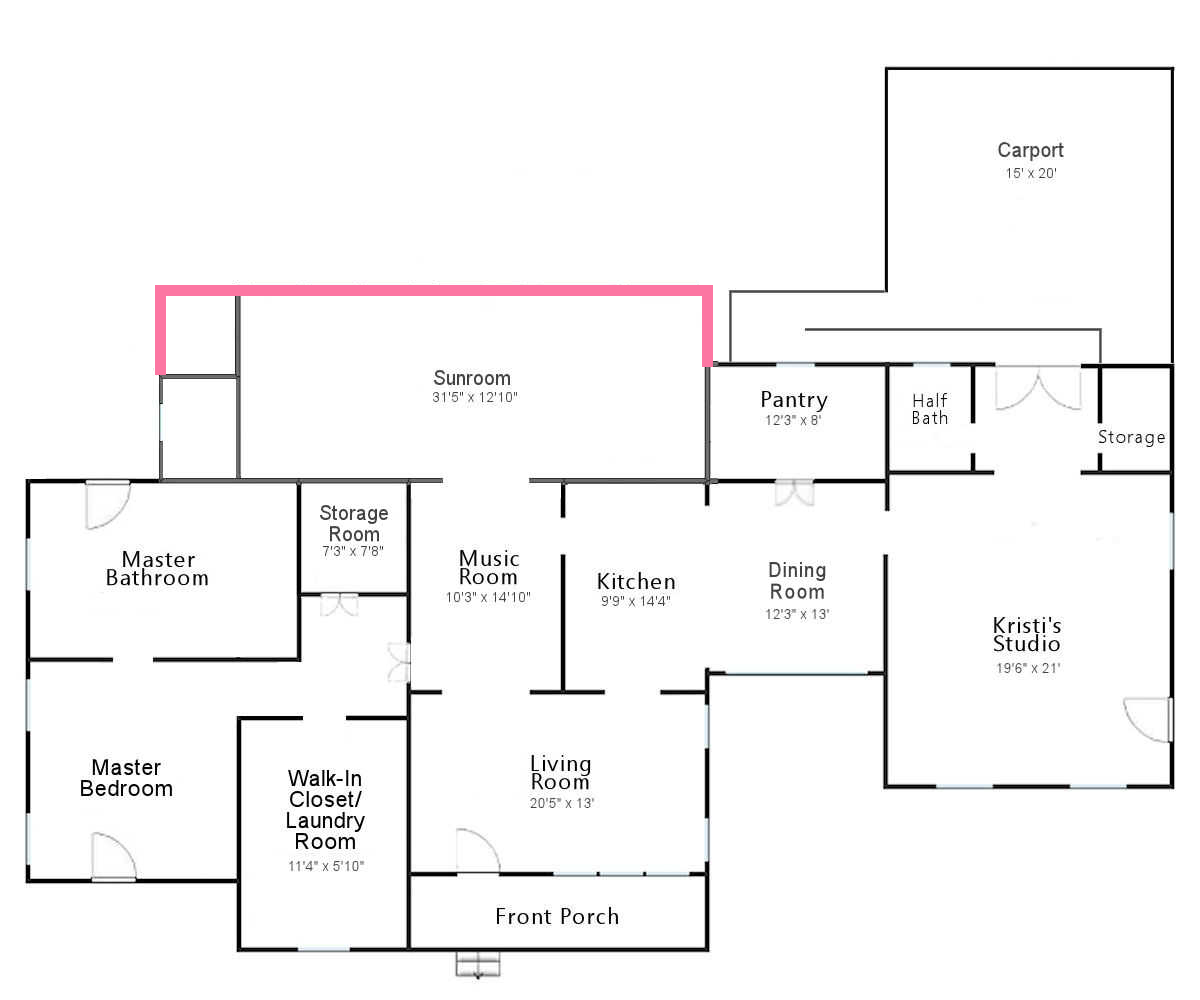
I’ll explain the basic process of “phase one”, and for reference, here’s what the current floor plan of our house looks like…
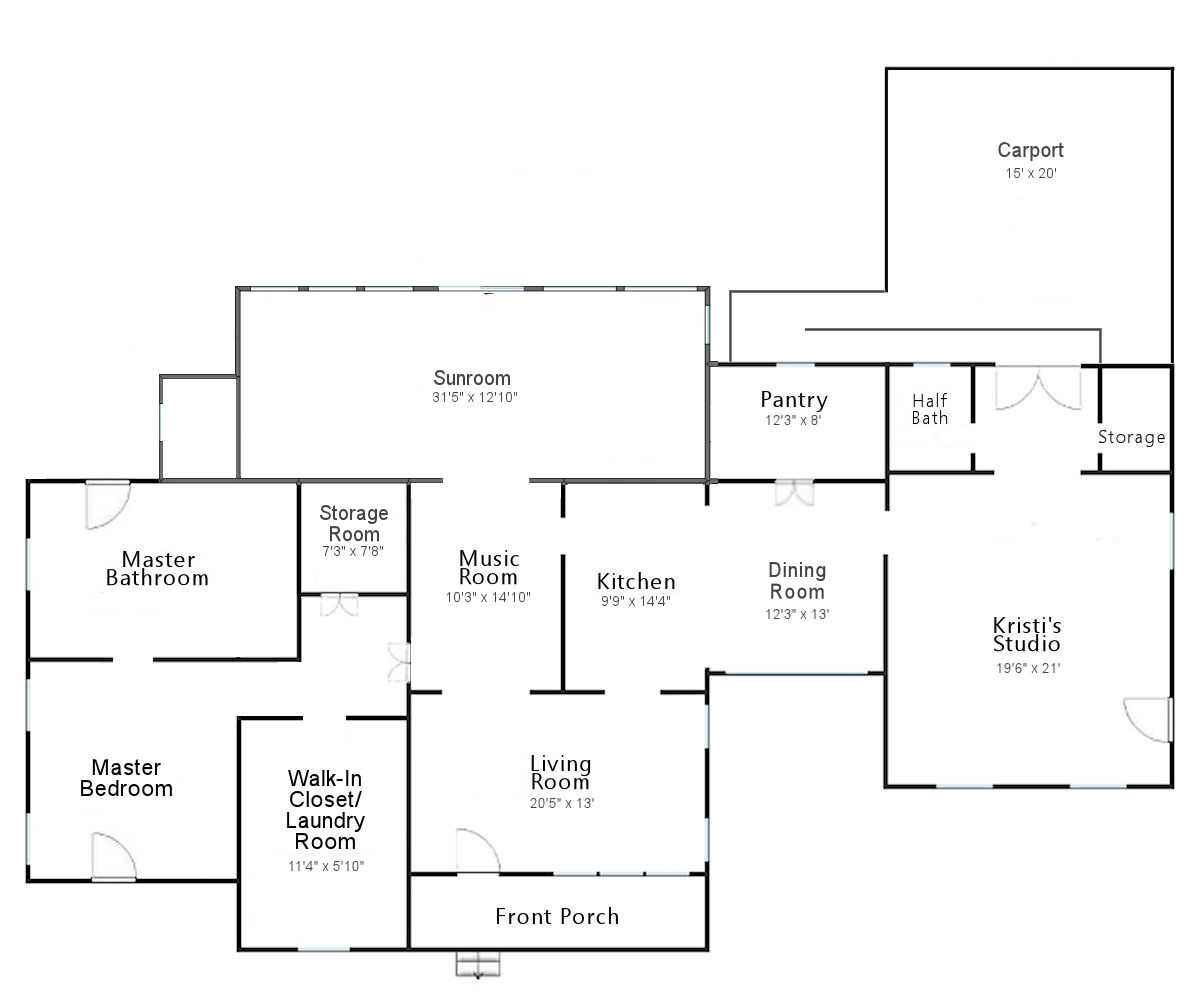
Keep in mind that the floor of the sunroom will eventually need to be raised so that it’s level with the rest of the house. And the rest of the house is on a pier and beam foundation. That means that the whole house has a concrete footing around the whole perimeter, and then the foundation inside that perimeter is built with wood beams that sits on that perimeter concrete footing and is supported inside that perimeter with concrete piers placed at specific intervals.
So the first step in the sunroom remodel will be tearing down the back wall of the sunroom in order to pour a new concrete perimeter footing starting at the back left corner of the little bathroom towards the back yard to square up that empty corner with the back wall of the sunroom, and then running the entire width of the bathroom and the sunroom, and then coming back on the other side of the sunroom to meet the wall shared with the pantry. That new concrete perimeter footing is show in pink on the floor plan below.
Once that concrete footer has been poured, then a new, taller wall will be built on top of the new concrete perimeter footing. And after the new, taller wall has been built, the new roof can be built on top of the new, taller walls. Obviously, that’s a very basic overview, so I’ve left off a few steps. But that gives you an idea of the basic process.
So after Mike left, I kept replaying that whole process in my head. The entire back wall of the sunroom would have to be torn down, a new concrete perimeter footing poured, and a whole new wall built. But if we bumped that back wall out three additional feet, which would make that room almost 16 feet rather than just under 13 feet, it’s the exact same process. Nothing changes about the process, but those three additional feet would make a huge difference in how the space feels, and would give me more flexibility in furniture arrangement. So I called Mike and asked him if he thought bumping that wall out three additional feet would make a huge difference in the cost, and he said no.
And then when I sat at lunch with my mom this week, we were talking about the remodel, and she was asking me about the layout. Obviously, I knew it wasn’t ideal to have a guest bathroom that’s accessible only by walking through a guest bedroom, but that was the only option in my mind at the time. But as we talked more about it, I realized that I actually have more flexibility if we’re going to bump that back wall out three feet. Here are the factors I was overlooking.
First, three feet is the minimum width of a hallway. So if we bump that back wall out three feet, that allows room for a hallway that we wouldn’t have if we kept the current footprint. But the second big factor I was overlooking is the fact that the current little bathroom doesn’t have to stay a bathroom. There’s currently no plumbing or electricity going to that room. It’s all been cut off since I wasn’t going to have any access to that room. I didn’t want any surprises like a plumbing leak in a room that I couldn’t access, so before they closed up that room, I had them cut off and cap off all of the plumbing and electricity. That means that in order to make that room a bathroom again, it needs all new plumbing.
If that room is going to need all new plumbing, that means that at this point, there’s nothing about that square footage that requires it to be a bathroom. I can just simply look at that space as available square footage that can be used however I want it to be used. It’s all going to be covered by the new roof, and the wall between that bathroom and the sunroom can be taken down since it won’t be load-bearing. So as of now, it’s just simply square footage that’s available to me to be used however I want it to be used.
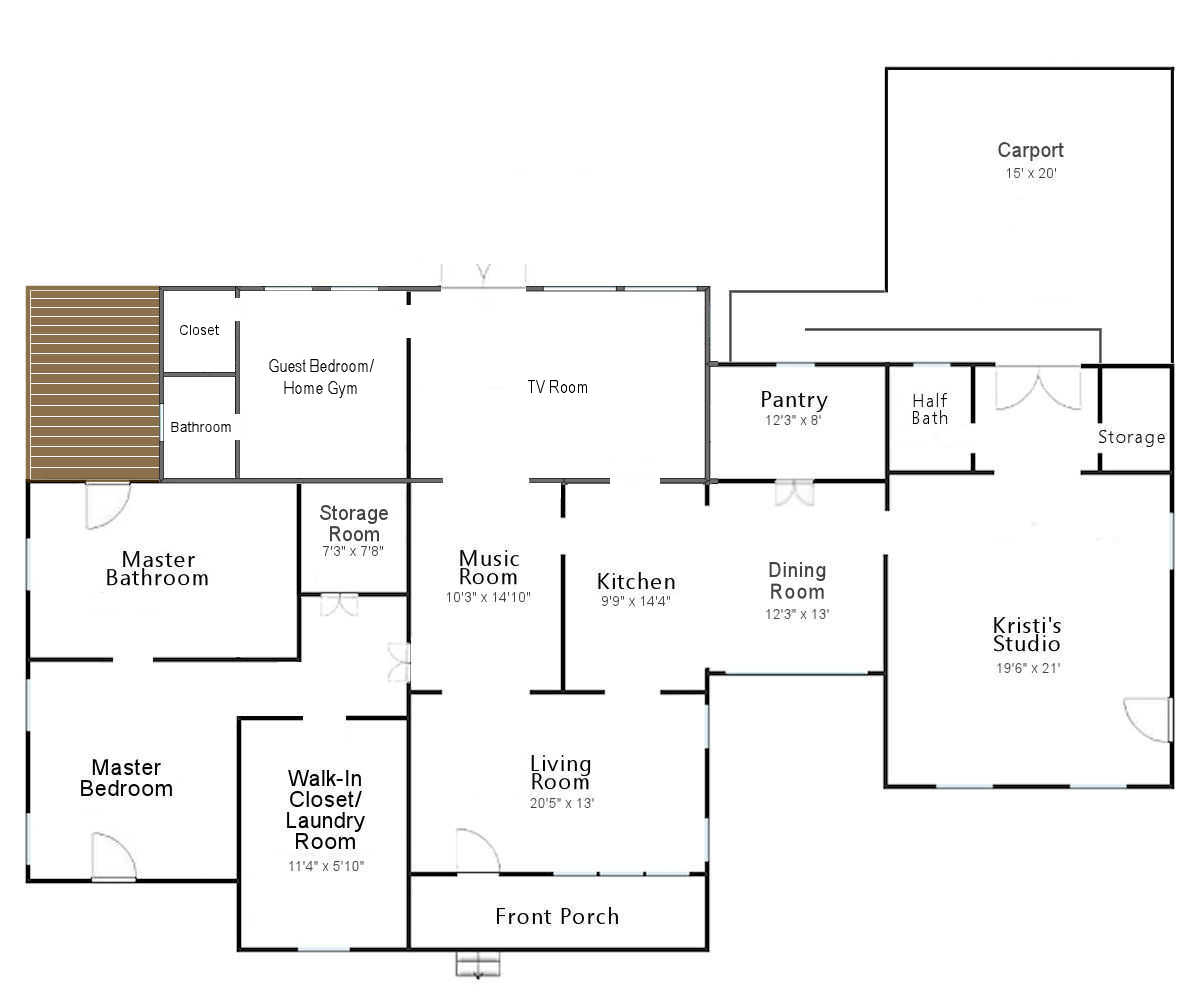
When I put those two factors together — there’s room for a hallway with the back wall bumped out three feet, and the bathroom doesn’t have to remain a bathroom — that gives me a whole lot more flexibility in the floor plan. So I sat down last night and moved some walls around, and I came up with this…
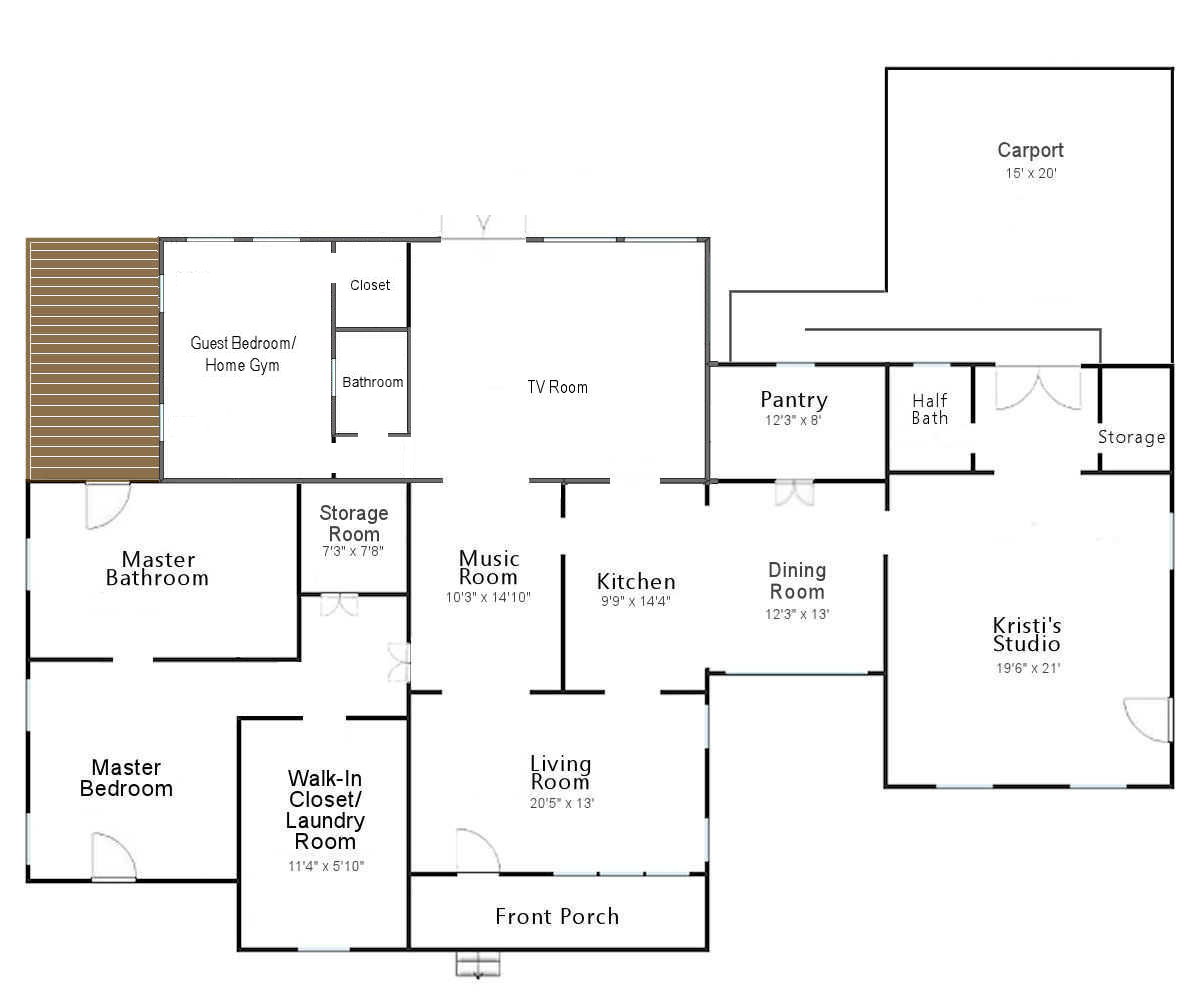
This solves so many problems! No guests would have to walk through a guest bedroom to get to the guest bathroom. The guest bedroom could have more windows and more natural light. If and when the room is used as an actual bedroom, you don’t have to enter the room and walk right into the side of a bed because the bed would be on the wall between the windows on the deck side of the room. And the fact that there’s a bathroom and closet separating the bedroom from the TV room means that it will be more private and quieter in the bedroom with that buffer between the bedroom and the TV room. And I can put a pocket door in the opening between the TV room and the hallway so that if we have a guest staying here, or if my mom ever comes to live with us, that pocket door can be closed to create a private suite back there.
This gets me so much closer to my original vision for this space, and while it won’t be as large as I had originally planned, this is a plan I can not only live with, but it’s one that I actually really love! I think it’s a great compromise between the original large addition that I dreamed about for so long and being forced to stay in the current footprint. I won’t get my big 20′ x 20′ family room, but a 20′ x 15’10” room is close enough. And those extra three feet will make a big difference.

Addicted 2 Decorating is where I share my DIY and decorating journey as I remodel and decorate the 1948 fixer upper that my husband, Matt, and I bought in 2013. Matt has M.S. and is unable to do physical work, so I do the majority of the work on the house by myself. You can learn more about me here.